Feeds:
Posts
Comments

Posts Tagged ‘holiday’

velveteen geranium -- probably actually-1

As soon as I saw Kaufman’s Lush Velveteens, I knew I wanted to sew this dress for Lila. The Geranium Dress pattern was an easy choice – it’s fast and simple, it always fits well (this is a 6 with some added length), and most importantly, it has Lila’s long-standing seal of approval.

velveteen geranium -- probably actually-1-8

Velveteen is great because it feels a little bit fancy while still being 100% cotton, which is really what I prefer to use for kids’ clothes. And I couldn’t resist this color. I decided to go with blue and gold and get it finished in time for Hanukkah so she could wear it all month long, which she did.

velveteen geranium -- probably actually-1-6

The bodice is lined with Morn’s Rays in Gold by Eloise Renouf for Cloud 9 Fabrics – I wanted something with a little metallic gold in it (of which there are many great options these days) to go with the sparkly gold trim, which I found locally at Fabric Depot.

velveteen geranium -- probably actually-1-10

I added the trim after the dress was finished and tucked it under at the back edges.

velveteen geranium -- probably actually-1-3

velveteen geranium -- probably actually-1-5

Lately I can only get motivated to sew when I have a very clear vision of what I want to make and I’m fully invested in the end result. It doesn’t happen as often as I want it to. I had every intention of making Christmas pajamas this year, but I ended up buying them. It wasn’t that I ran out of time. I spent hours looking at patterns and fabric, but I couldn’t pull the trigger – nothing was really doing it for me. I don’t want to make just for the sake of making, you know? I want to sew something I’m really excited about, something I can’t wait to see come together. I definitely sewed less this year and that trend will probably continue, but I’m hoping what I do sew will be well thought out and satisfying.

velveteen geranium -- probably actually-1-7

I hope everyone’s holidays were wonderful. Happy 2016 from these guys!

kids-1


Read Full Post »

These were made (patterns traced, fabric cut, pants sewn) with lightning speed, in assembly-line style, on the 23rd of December. If you’ve left your Christmas Eve pjs to the last minute, this pattern is your friend. Inseam, Inseam, cuff, cuff, rise, waistband. Done! charley harper pjs -- probably actually-1I bought both kids $4 Old Navy t-shirts and just left them as-is this time (except for the addition of some running stitches on Lila’s pocket) – bare bones, people. PANTS ONLY.

charley harper pjs -- probably actually-1-2

The turquoise birds (Red Eye Vireo) are from Birch Fabric’s first Charley Harper line, and Oscar’s penguins (Murre) are from the new line, Nurture. The Birch poplin has such a nice feel and sheen to it – it’s smooth and crisp and a little more substantial than your average quilting cotton…if that makes any sense. There are so many cool prints in these two Charley Harper lines, and you really have to see them up close to fully appreciate them.charley harper pjs -- probably actually-1-3

I used Moda’s Indigo Pinstripe for Oscar’s cuffs and waistband, and the green contrast on Lila’s is one of the Cotton + Steel Basics, Dottie in Picnic.

charley harper pjs -- probably actually-1-4The Oliver + S pajama pants are always a hit around here, but I do feel like I’m in a bit of a rut with them. Next year maybe I’ll try knit pjs (Flashback Skinny Tee + Fancy Pants leggings like Elizabeth’s), or maybe a nightgown (did you see Rachel’s?) for Lila. Or, more likely, it’ll be these again on the eve of the 23rd.

Read Full Post »

I tried to keep my December sewing to a minimum this year, which was really very nice. Christmas clothes weren’t originally on my list, but then I saw the adorable plaid Art Museum vest Elizabeth (of the lovely blog Lizzieville) made for her little boy. She mentioned in the post that her daughter asked for a dress to match, and suddenly my kids needed matching Christmas outfits, too. And so, I sewed.

christmas attire -- probably actually-1-2 
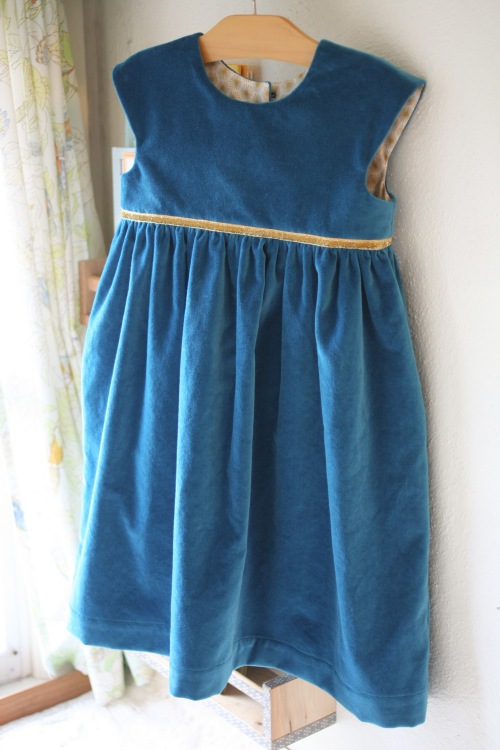
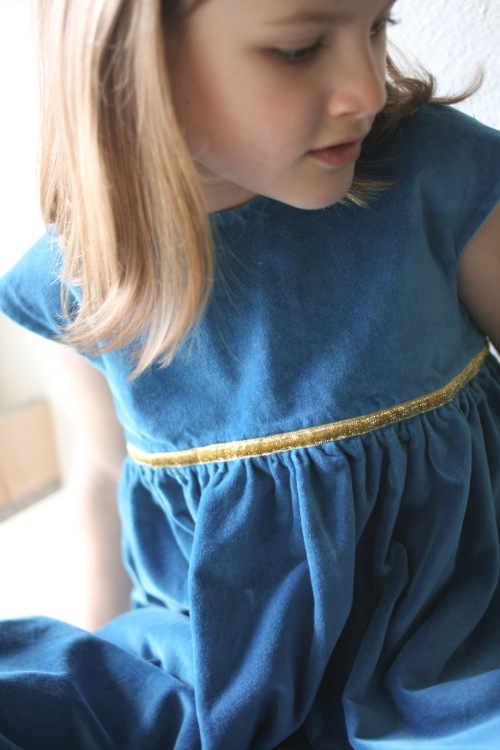
Elizabeth was actually the inspiration for the dress, too – I really loved her Library Christmas dress from last year, and I also came across this beautiful corduroy/Liberty version via my Oliver + S Flickr group search. So, despite having just made a Library dress (and swearing off this view), I decided on View B in baby cord with a floral band…but then I never found a good floral. I almost scrapped the whole thing, but at the last minute I looked through the piles of fabric already on my shelf and found this striped shot cotton.

christmas library dress -- probably actually-1
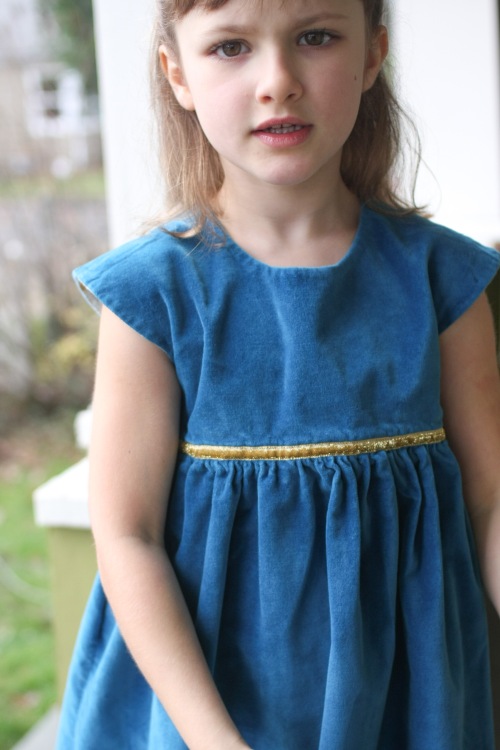
I can’t recall why I bought this fabric in the first place, but I’m pretty sure it ended up lost in the stacks because the colors reminded me too much of Christmas. So anyway, long story short, I ended up with dark gray Kaufman cord, some forgotten striped shot cotton, and flat piping in a green Modern Solid. I sewed a size 5 lengthened to a 6, and also lengthened the sleeves by an inch. Lila isn’t a big fan of 3/4 sleeves so I wanted to pass them off as long sleeves. She won’t wear them rolled up, but I do love the notched cuffs.christmas attire -- probably actually-1-3

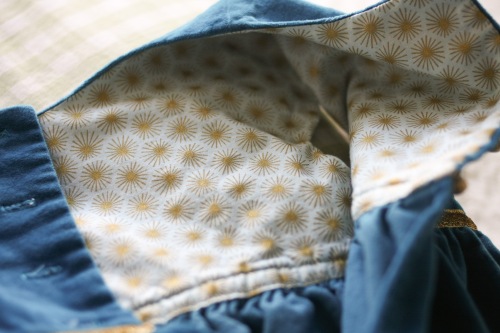
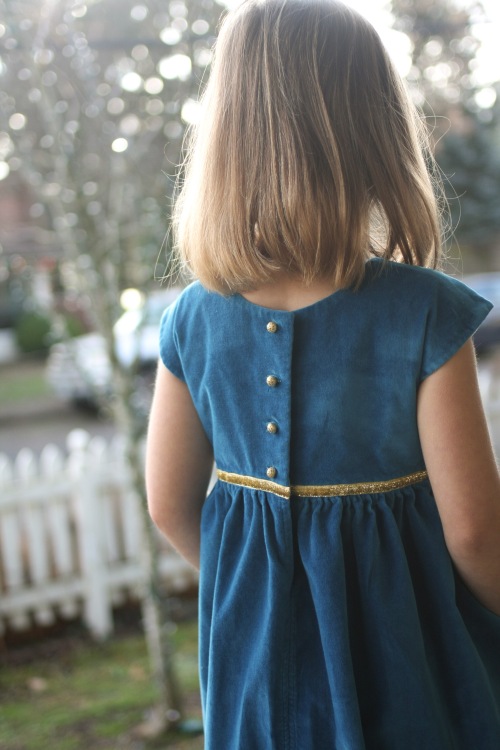
There wasn’t enough corduroy for the facings (I squeezed the whole dress into a wide yard of fabric with some very careful planning), so those are cut from the shot cotton. Luckily Liesl has you understitch all the facing seams, so there’s no chance they’ll be peeking out when they shouldn’t. But they do make for a nice surprise inside.

christmas attire -- probably actually-1-4

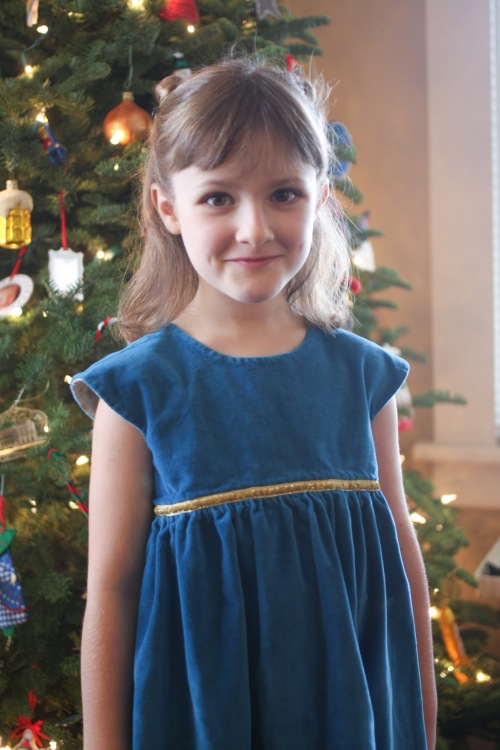
Having made both views, I think the collar must give the neckline a little more structure and hold it in place, because the neckline on this dress gapes a little more than the collared version. Nothing too serious, but I did notice a difference.

christmas library dress -- probably actually-1-2And again with all those buttons down the back. But I was happy to find these little black and green ones.

Now, on to that bow tie.

christmas bow tie -- probably actually-1-2

I read through just about everything the internet had to offer on the topic of making your own bow tie, but in the end I used Delia‘s free Mix and Match Bow Tie pattern and tutorial. I knew I could trust Delia. It was super simple and quick to sew – in fact, I bet I spent more time learning how to tie it than actually sewing it. But thanks to YouTube and Jesse Tyler Ferguson (Lila and I must have watched this video twenty times, she thought it was hilarious), tying a bow tie is now on my list of life accomplishments.

christmas bow tie -- probably actually-1

Apparently bow ties are usually cut on the bias, but since shot cotton already has some stretch, I cut it on the grain. And I used velcro as my back closure method rather than swim suit hooks, just to make sure it was good and adjustable. It’s a little droopy (interfacing could have solved that) but I love it just the same.

christmas bow tie -- probably actually-1-4Who knew I’d ever get so excited about a bow tie? And to think, I was so broken up about not having two girls to sew for…this is totally just as great. Maybe even better. Maybe. Sort of. Whatever, it’s great.

christmas bow tie -- probably actually-1-3
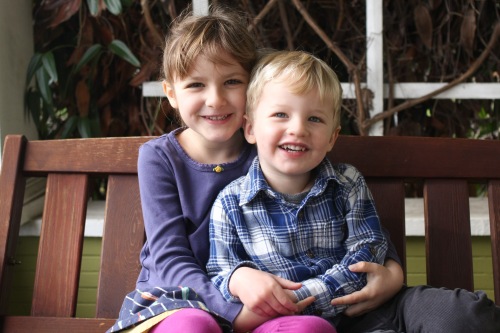
They were pretty cute together. I’m officially a fan of coordinated holiday attire.

christmas attire 2 -- probably actually-1

There were also some eleventh hour semi-coordiated Christmas pajamas that I’ll share just as soon as I can get my children to cooperate for photos. Hope everyone’s holidays were happy – enjoy these last few days of the year!

Read Full Post »

For my next installment of “things I didn’t knit” I’d like to introduce you to the bunnies my mom made for this year’s Easter baskets.

little cotton rabbits -- probably actually-3

They’re pretty cute on their own, but they also have tiny bunny wardrobes, which of course takes things to a new level.

little cotton rabbits -- probably actually-13

We take dressing up our little friends pretty seriously around here, and we’re having so much fun playing with these.

little cotton rabbits -- probably actually-11

I’m definitely including myself in that “we” – technically there was one bunny for each kid, but you know how it goes.

little cotton rabbits -- probably actually-8

The patterns come from Julie Williams of Little Cotton Rabbits. There’s all sorts of adorableness to be seen on her blog and in her Flickr stream (the rabbits! the elephants! the miniature dresses and sweaters!) – I’m in awe of this woman. Her knitted animal and dress patterns can be found in her Etsy shop. And she occasionally sells her own creations in the shop, too.

little cotton rabbits -- probably actually-11

That’s all. I’ve got my eye on the robin dress next – stay tuned for expanding bunny wardrobes!

little cotton rabbits -- probably actually


Read Full Post »

As usual I have many projects on my list for Kids Clothes Week, but OBVIOUSLY my number one priority was brother/sister bunny pajamas for Easter. I never pegged myself as the type to sew coordinating anything for my children, but apparently I am exactly that type.

sleepy bunny pjs -- probably actually-6

Every year I envision myself making Christmas pajamas, and every year December fills up with other things. In fact the only year I actually made them, they were finished in November. That’s probably the key. Anyway, I found this cute bunny fabric right before the New Year, and fresh with my failure to deliver Christmas pajamas, I snatched it up for Easter pjs. I figured four months of lead time should be enough to make it happen.

sleepy bunny pjs -- probably actually-7

The pants are made with the Oliver + S Sleepover Pajamas pattern. Oscar’s are size 18-24 months and came out pretty big, but I’m not concerned – they’ll probably fit tomorrow. He is huge for his age and just keeps on gettin’ huger. And I would’ve preferred to make Lila’s in a 5 (her last pair were 4s), but since I only have the smaller size range in this pattern I used the 4 and added a 1/2 inch to the rise and another 1/2 inch to the legs, which worked out just fine. I like that the cuffs on the Sleepover Pajamas can be rolled up or let down for a more adjustable fit.

sleepy bunny pjs -- probably actually-10

I used Old Navy t-shirts for the tops, and added snoozing bunny patches. T-shirts are easy enough to make, but at $4 a pop, they sure are easy to buy, too.

sleepy bunny pjs -- probably actually-3

The bunnies (Bunny Brigade from Critter Patch Organic) are from Clothworks and were designed by Alyssa Thomas of Penguin & Fish. So that explains why they’re so cute. Just like her embroidery patterns.

sleepy bunny pjs -- probably actuallyThe cuffs and waistbands are Lizzy House’s Jewels in Aqua and Peach.

sleepy bunny pjs -- probably actually-8

I hope to finish at least one more project this week – in the meantime I’ll be perusing everyone else’s KCW creations!

pincushion_button_300_square


Read Full Post »

I saw this post on Prudent Baby last year and I’ve been daydreaming about making bird wings ever since.

Luckily Lila made no specific requests for a Halloween costume, so I was able to steer her in the direction of “bird” pretty easily.

I had a hard time getting motivated and came close to ditching the idea of a handmade costume, but once I got started, it was a totally pleasant project – time consuming with all that feather cutting, but straightforward and easy. And choosing the fabrics was the most fun…per usual.

I used this tutorial from Llevo el Invierno for the wings, and just made a few changes.

After measuring Lila’s “wingspan” I decided to add a few inches to each wing (the directions say they’ll fit 18 months to age 3, but it doesn’t hurt to measure and cut accordingly). So my wings are 15 x 15 inches, rather than 13 x 13. I added 1/4 inch elastic loops instead of finger ties, and instead of tying at the neck, I attached elastic shoulder straps under the top binding so that she can get into them herself.

I also bound the side edges along with the top, just to clean things up a bit.

And a felt bird mask to finish things off.

Happy almost Halloween!

Read Full Post »

I saw this pin pop up all over the place yesterday, which led me to Mer Mag’s “Easy Bunny Candy Pouch” – and before I knew it I had some felt bunny pouches of my own.

It was exactly the kind of project I was in the mood for – there’s a printable template, I had all the supplies on hand, and each little pouch took about 10 minutes from start to finish. Embroidering the bunny faces was fun, and you can customize them any way you like – I used the sleepy eyes from the template and added a little mouth, then cut some fabric scraps for inside the ears.

These were so simple to make – cut out a back and front, stitch the little face, and sew the two pieces together, leaving a gap between the ears so you can fill it with treats.

Then tie the ears together, and your bunny pouch is complete!

I haven’t shopped for Easter treats yet so I plumped up the pouches with felt balls for the purposes of these photos. I’m hoping to come up with something besides candy to stick inside – Lila has her first dentist appointment tomorrow and I’m a little nervous…she definitely inherited my sweet tooth. But even if it’s not candy, I think it’ll be fun to get these out every year and fill them with some sort of treat.

Here’s another link to the original bunny pouch post, where you can find the template and instructions. They’re so quick – there’s still plenty of time before Easter to make one (or a whole slew of them) if you’re in the mood!

Read Full Post »

Lila’s little kitchen is pretty well stocked, but we’ve been lacking a tea pot for some time now. So for Valentine’s Day this year she’s getting her first tea set.

And I thought play tea bags would be fun, too.

The idea to make tea bags came from here, but once I got started, I went a little nutty with the details. Not that Lila will notice (or care) how closely they ended up resembling bona fide tea bags, but I get pretty excited about creating tiny versions of real things, so I went for it.

It was easy enough to do – I just deconstructed a real tea bag and made a mini version out of muslin and felt. A tea bag, as it turns out, is just a long tube with a seam down the center, pinched at the bottom, and folded in and over at the top.  I had some silver thread on hand (purchased for a Christmas craft that never materialized), so I used that to mimic the metal staples that close the bag and attach the string to the tag.  And since they’re for Valentine’s Day and all, I embroidered little heart tags in Valentine-y colors.

I hadn’t planned to fill the bags, but since I’d already destroyed two real tea bags in the process, I figured all that tea shouldn’t go to waste. Lila’s past the age where she puts things in her mouth, so it seemed safe enough. And it gives the bags a nice weight and smell. I sewed the bags up very securely by machine before adding the silver “staples” – that tea isn’t going anywhere.

At the last minute I decided to make some little felt sleeves for the tea bags (with the exact same labels as my Valentine envelopes) – no details on these, just two rectangles sewn together.

I think that about covers this installment of tiny. Here’s everything packaged up. I covered the top of one of those $1 Joann’s craft boxes with washi tape. Always looking for an excuse to use my washi tape.

Happy almost Valentine’s Day!

P.S. I’m going to sew some clothes soon, I promise.

Read Full Post »

I’ve long admired the Oliver + S Puppet Show Dress, but despite much internet scouring (much like my experience with the Playdate Dress), I was never able to find a copy of the pattern after it went out of print. Then a few months ago Oliver + S came to the rescue and released it as their first digital pattern, so I decided to give it a try for Christmas this year.

I’d personally rather pay a little more for an original copy of the pattern, mostly because they’re such lovely things to have around, but I must say, the pdf version was flawless. They give you the option of printing the pattern pieces on 8.5 x 11 paper at home, or in one large sheet at a place like Kinko’s. I priced it out at Kinko’s but $9 seemed steep, so I used my own printer. Any pattern pieces that were too large to fit on one sheet of paper were printed with a one-inch grid behind them, which made them really easy to line up. And everything lined up perfectly, which never seems to happen for me when I print a pattern from a pdf file. Cutting and piecing was was time consuming (it took me over an hour to prep all the pieces), but the fact that everything fit together so nicely made it all okay.

I got stuck with the directions at one point – I must have reread them ten times and I still couldn’t wrap my mind around what I was supposed to do. Luckily, I was working on the dress at the Friday Night “Sew-cial” at Modern Domestic (a gorgeous classroom/open sewing studio and Bernina dealership in NE Portland), which meant there was someone on duty to answer questions (none other than Shelly Figueroa of Sewing for Boys and Patterns by Figgy’s!) – she helped me make sense of the directions, and the rest was pretty much smooth sailing.

And those three hours I spent on this Bernina 330 kinda ruined any love I ever had for my own machine. It was pretty dreamy.

Anyway, here’s Lila in the dress. It’s a 2T and it ended up fitting pretty well, I think.

I love the sweet little details, like the peter pan collar, puffed sleeves, and button-up sleeve cuffs.

The not-so-Christmasy fabric is a pink and red Moda pindot from the Ruby line by Bonnie & Camille, and the collar and sleeve cuffs are Kona Snow.

I’ll admit, the inside of this dress is less than beautiful, but hey, it’s the inside after all. And I didn’t finish the hem facing by hand, I just didn’t have it in me. I was really just ready for it to be done so that I didn’t have to tell Lila that her daddy would be putting her to bed again because I needed to work on her dress. To which she responded each time, “No YOU put me to bed, and daddy will work on my dress!” I tried to explain to her how ridiculous that suggestion was, but she didn’t find it anywhere near as hilarious as I did.

And last but not least, a photo from her visit with Santa today. I know, poor Baby Girl, forced to wear last year’s Christmas dress again. This was the best shot we got – totally stone-faced and leaning toward safety.

But you can’t hope for a gem like this every year…

Read Full Post »

Lila’s tree costume is coming together. It’s a simple little costume, but I managed to make it a lot of work anyway. I’ve heard people say it’s silly to put a lot of time and effort into a Halloween costume that’s going to be worn once, and that makes perfect sense. Unfortunately, I can’t seem to do it any other way – maybe I’ll feel more comfortable throwing things together once I become a better sewer, or maybe I’ll never be a corner-cutter, who knows. So yeah, all my seams are finished and the oak leaves have veins. And I didn’t get anything else done all week.

The wood grain dress is Leila & Ben’s Sweet Little Dress pattern with lengthened sleeves. And a knothole.

The blue leaves were Lila’s idea, by the way. She really, really wanted blue leaves. I got a blank stare when I tried to explain photosynthesis, and besides, who am I to deny my daughter a couple blue leaves on her tree?

I’m pretty sure the squirrel is what sold her on the costume. It’s attached with velcro (a la Sophie’s super cool interactive stuffie shirt) so it can scamper around in the branches and collect acorns. Lila’s into it!

There are a couple details still in the works, but it’s almost done, and I’m pretty excited for this thing to get its couple hours of wear. And maybe we can throw it into the dress-up bin (which we don’t yet have, but hope to someday) after Halloween…

Read Full Post »

Older Posts »